Learn Selenium and Java for Selenium

Tuesday, 24 May 2016

Automation Framework


Author : Ashwini Velapure (Test Automation Engineer) https://www.linkedin.com/in/ashwinivelapure

What is Automation Framework?
In simple words ,it is nothing but structure of code.
While starting for Automation Testing ,we need to have clear understanding for different types of  automation framework.
Types of Automation Framework:

  • Linear  FrameWork:
It is just sequential code. Steps  are collected one by one. More hard coding of values is one of the  drawback  of linear framework.
In selenium IDE, we can record flow. If we extract testcase,We will get  the java  code.You will get piece of code,which we can say linear automation framework.
For example, if we are automating Login application.Within linear frame work we will follow below steps:
a) Open URL for login page.
b) Enter the details.
c)  Click on Login.
d) Verify the home page

  • Modular Framework
In modular framework,there is dedicated doe for particular functionality, which can be called as ‘Module’.
For achieving this modularity, we are using JAVA,VB etc.
For example, if we are automating Login application and we need to save screenshots.
Within Modular frame work we will have separate  module for take Screenshot. This module will have code for taking screenshot and saving it on desire location
Whenever we land on page we will call take Screenshot  module
Steps :
a)Load Login Page
b)Call take Screenshot
c) Enter the details.
d) Click on Login.
e) Call takes Screenshot

  • Data Driven Framework:
When an application need to test with different set of data, Data driven Frame wok comes into picture.
For example:
If we are automating any login application and we need to check with different username and password. In this scenario we can keep separate data sheet for username  and password. Here we can use JXL/Apache POI for reading data sheet

  • Keyword Driven Framework:
It is similar data driven. Here we are reading keyword from data sheet instead of test data. This keyword may have one of the module associate with it.

  • Hybrid Framework
Hybrid Framework is combination of Data Driven framework and Modular Framework. This is commonly used framework.

  • TestNG Framework
This is advanced framework. It is famous for its reporting feature. We had  already had discussion on the previous blogs

Why Automation  Framework?
Definite structure of code  is very important ,below are some advantages:

  • Reusability
  • Maintainability
  • Readability
  • Scalability
How to select Type of Framework?

  • Based on Complexity of Web Application
This complexity can be determined  by number of pages and their web elements.
Also Number of scenarios incorporated for particular web application workflows.
So, for less complex application we can go with Data Driven FrameWork and for more complex application we can Hybrid framework

  • Based on Reporting requirement
Most of the Business people are not bother with code sctructure.They are only interested in Output.
So, reporting comes into the picture.TestNG  framework gives excellent reporting feature.


Sunday, 22 May 2016

TestNG| Creating the First Case

How to create Test Case using TestNG?

Creating TestCase is simple using TestNG. The main motive to create a Test Case using TestNG is because of it powerful framework and to avoid main() method.

Steps to create a TestNG  Test case

  • Ensure TestNG is correctly configured in Eclipse(Install TestNG)
  • Import the Package import org.testng.annotations.* in the respective Class
  • Use Annotation @ Test to run a particular Test Case
  • Run the Program  as TestNG
Running the Program as a TestNG


The below diagram depicts the flow of Running of Test Cases in accordance to Annotations used

Flow of Running the Test NG Cases 

 import java.io.File;  
 import java.io.IOException;  
 import org.apache.commons.io.FileUtils;  
 import org.openqa.selenium.By;  
 import org.openqa.selenium.JavascriptExecutor;  
 import org.openqa.selenium.OutputType;  
 import org.openqa.selenium.TakesScreenshot;  
 import org.openqa.selenium.WebDriver;  
 import org.openqa.selenium.WebElement;  
 import org.openqa.selenium.chrome.ChromeDriver;  
 import org.openqa.selenium.firefox.FirefoxDriver;  
 import org.testng.annotations.*;  
 public class TestNGProgram {  
      public WebDriver driver;  
      @BeforeClass   
      public void setup()  
      {  
           this.driver=new FirefoxDriver();  
      }  
      @AfterClass  
      public void teardown()  
      {  
           this.driver.quit();  
      }  
      @Test  
      public void loadpage()  
      {  
           driver.get("https://www.facebook.com/");  
           String s =driver.getTitle();  
           System.out.println(s);  
      }  
 }  


Notes
  1. this is a keyword in Java that can be used to refer current class instance variable hence it used to access the driver variable.
  2. Order of execution of above tests annotation is @BeforeClass>@test>@AfterClass
  3. There is no need to write main() method
  4. Title of facebook page is fetched using getTitle() method
Output


Saturday, 21 May 2016

Reading a Excel File using Apache POI


Author : Ashwini Velapure (Test Automation Engineer) https://www.linkedin.com/in/ashwinivelapure

Steps to Read the Excel File

  • Specify the Location of File
  • Load WorkBook
  • Load Sheet: Sheet can be loaded via getSheetAt() method , sheet name /index can be passed as argument.By default Sheet1 has zero index and so on
  • Load Cell: There are 2 methods offered by XSSFSheet class , one is get row() and the other is get Cell() ,the row number and the column number are passed as an argument respectively
  • Read Data
 import java.io.File;  
 import java.io.FileInputStream;  
 import java.io.IOException;  
 import java.util.Iterator;  
 import org.apache.poi.ss.usermodel.Row;  
 import org.apache.poi.xssf.usermodel.XSSFCell;  
 import org.apache.poi.xssf.usermodel.XSSFRow;  
 import org.apache.poi.xssf.usermodel.XSSFSheet;  
 import org.apache.poi.xssf.usermodel.XSSFWorkbook;  
  public class ReadFile {  
      public static void main(String[] args) throws IOException {  
           // TODO Auto-generated method stub  
           FileInputStream file = new FileInputStream(new File("C:\\Users\\Ashish Banka\\Downloads\\Test1.xlsx"));  
           XSSFWorkbook workbook = new XSSFWorkbook(file);    
           XSSFSheet sheet = workbook.getSheetAt(0); //Read Sheet 1,   
           String S= sheet.getRow(0).getCell(0).getStringCellValue();  
           System.out.println(S);  
      }  
 }  

Notes

1-Eclipse support one forward slash or two backward slash ,so we have used two backword slash in order to locate the file
2- XSSFWorkbook is a class so we have created one reference variable "workbook" in order to access the method of this class which is getSheetAt()
3- As we know XSSFWorkbook is a class, its object can be created via new XSSFWorkbook(File)
4-getStringCellValue () method return a string value of Cell so we have stored in a string called "s"

Output


Output of Excel File displaying Row 0 and Column 0 value

Excel Sheet


Excel File used for Reading


Friday, 20 May 2016

What is Apache POI and how to Download it


Author : Ashwini Velapure (Test Automation Engineer) https://www.linkedin.com/in/ashwinivelapure

APACHE POI

What is Apache POI?
Apache POI is a powerful Java library to work with different Microsoft Office file formats such as Excel, Power point, Visio, MS Word etc.

In this API we can handle different types of excel files. Most of the interviewer don’t satisfied with only JXL.It is good to know about APACHE POI
Here, we go for Apache POI.


STEPS FOR GETTING APACHE POI:
  • Download ‘poi-bin-3.14.tar’ file from https://poi.apache.org/download.html

  • Extract the above .tar file to any folder
  • Right Click on Eclipse Project->Build Path->Configure Build Path->Libraries->Add external jar.
  • The following jar files needs to be added
    
    • Under ooxml-lib folder
         
    • Under lib folder
            
  • Brows all the above the poi jar file and add it
  • Here you can access the all Apache POI classes.


Friday, 6 May 2016

TestNG :Annotations Basic Concept

Annotations and its usage in Test NG

TestNG supports a series of annotations which are invoked when running the code. The Annotations is the powerful feature provided by TestNG in order to avoid using the Main() method.

Following are most commonly used annotations in Test NG

@BeforeSuite :-Annotates methods that will be run before any method in a given is run.

@BeforeGroups:-Annotates methods that will be run before the first method in any of the specified groups is run.

@BeforeClass:- Annotates methods that will be run before the first method on the current test class is run.

@BeforeTest:- Annotates methods that will be run before any method in a given is run

@BeforeMethod:-Annotates methods that will be run before each test method

@AfterMethod:-Annotates methods that will be run after every test method.

@AfterTest:-Annotates methods that will be run after all the test methods in a given have been run.

@AfterClass:- Annotates methods that will be run after the last test method on the current class is run.

@AfterGroups:-Annotates methods that will be run after the last test method belonging to the groups specified in its value attribute has been run. The annotated method is automatically put into these specified groups.

@AfterSuite:- Annotates methods that will be run after all the test methods in a given have been run.

@ Test : Annotates method as a Test Case

Note: While Running a Test Case with @ Test Annotation there is no need to write main() method


Sunday, 1 May 2016

TestNG and its Installation

What is TestNG?


TestNG is a testing framework for the java programming language inspired by JUnit and NUnit.The design goal is to cover wide range of Testing: Unit,Functional ,Regression etc.


Advantages of TestNG

  • TestNG supports many powerful features & it is easy to use. Let’s see what all new features are supported in new testing framework:
  • Support for parameters.
  • Supports dependent methods testing.
  • Test configuration flexible.
  • Supports powerful execution model.
  • TestNG has a more elegant way of handling parameterized tests with the data-provider concept.
  • For the same test class TestNG support for multiple instances.
  • Extendibility of using different Tools and plug-ins like Eclipse, Maven, IDEA etc.
  • Default JDK functions for runtime and logging (no dependencies).
  • Supported different Annotations like @BeforeSuite, @AfterSuite, @BeforeClass, @AfterClass, @BeforeTest, @AfterTest, @BeforeGroups, @AfterGroups, @BeforeMethod, @AfterMethod, @DataProvider, @Factory, @Listeners, @Parameters, @Test.
  • TestNG allows us to generate test reports in both HTML and XML formats.

How to Install TestNG and configure it in Eclipse?

Steps for installation:

1. Click Help –> Install New Software


2. Type “http://beust.com/eclipse” in the “Work with” edit box and click ‘Add’ button

3. In the ‘Name’ column we can see “TestNG” –> Select this and click ‘Next’ button


4. Click Next and click on the radio button “I accept the terms of the license agreement”

5. Click ‘Next’ button

6. Click ‘Finish’


This will install the TestNG plug-in for Eclipse

After the installation, it will ask for restart of Eclipse. Then restart the Eclipse.

Once the Eclipse is restarted, we can see the TestNG icons & menu items as in the below figures.


Creating Object Repository Using Properties file in Selenium Webdriver

What are Properties file and why we need it?

In Selenium web driver there is not any build in facility to create object repository, so maintenance of page objects becomes very hard if we write all objects of page on code level.So we can create Properties file support of java software in order to store the object X-Path/Id of a location of web element in this file

How to create a Properties file?

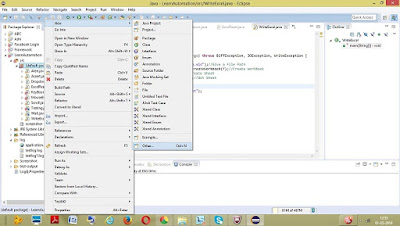
Step 1-Right click on project package ->New->Other


Step 2 :- On New Wizard window ,expand general Folder and select file and click on Next Button

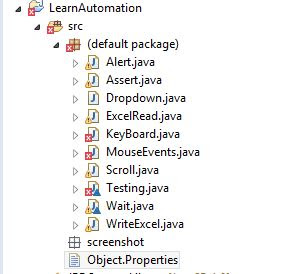
Step 3:- Give the file name as Object.Properties and click on Finish button, which will add the Properties file under a Package


Step 4:

Double Click  on Properties file to add the X-Path of the "Login" button of the Facebook page

X-path of Login button of Facebook


The below code Read X-Path of "Login" button from the Properties file and then click on "Login" Button of Facebook

 import java.io.File;  
 import java.io.FileInputStream;  
 import java.io.IOException;  
 import java.util.Properties;  
 import org.apache.commons.io.FileUtils;  
 import org.openqa.selenium.By;  
 import org.openqa.selenium.OutputType;  
 import org.openqa.selenium.TakesScreenshot;  
 import org.openqa.selenium.WebDriver;  
 import org.openqa.selenium.chrome.ChromeDriver;  
 import org.openqa.selenium.firefox.FirefoxDriver;  
 import org.testng.annotations.Test;  


 public class ReadPropertiesfile {  
        
 public static void main(String[] args) throws IOException {  
             
 WebDriver a= new FirefoxDriver();  
 a.manage().window().maximize();  
 a.get("http://www.facebook.com");  
             
 //Create Object of Properties Class.  
 Properties obj = new Properties();   
 //Create Object of FileInputStream Class. Pass file path -  
 FileInputStream objfile = new FileInputStream(System.getProperty("user.dir")+"\\src\\Object.Properties");   
 //Pass object reference objfile to load method of Properties object  
  obj.load(objfile);  
              
 //Accessing element locators of all web elements using obj.getProperty(key)  
 a.findElement(By.xpath(obj.getProperty("Sumbit"))).click();   
 a.quit();  
             
 }  
 }  


Notes

1-FileInput Stream is a class offered by java to read data from a file
2- Properties Class offers a load(InputStream Is) which loads data from InputStream Object which is objfile
3- getProperty("user.dir") will return the current project directory/ to get the path of the workspace

Output


Popular Posts

Recent Posts


Newsletter

Join our newsletter to get secret tips directly in your inbox!


*We Hate Spam!

Powered by Blogger.